Showing posts with label Dessert. Show all posts

Tuesday, August 5, 2014

Ice Cream for Babies

Say wait?  Ice cream for babies?  Big no, no mama.  Or is it?  Not this kind, it's super healthy and is a-okay for everyone in the family!  Unless you have a peanut allergy, then I'd suggest avoiding.  We went to a local ice cream shop a couple weeks ago and if you follow me on Instagram, you saw this pic.


I feel bad when we have treats but Graham can't have them.  I feel like before one is a no go for ice cream and avoid it as much as possible even after one.  So here's a simple treat for your littles that's yummy and easy to make.

Ingredients
3 super ripe bananas, sliced and frozen
1 tablespoon of peanut butter

Blend in a blender.

That's it. Best thing ever and I like to make enough and put in one of those containers and freeze so I can grab one quick for Graham when we're headed to the ice cream shop.

-stephanie

Tuesday, March 4, 2014

Strawberry Shortcake

Sunday was another dreary cold and snowy day in Columbus so we stayed in the house nearly all day.  Dinner was lemon chicken and broccoli so I figured we could splurge a little for dessert.  Enter the strawberry shortcake.


It's one of my favorite desserts, so tasty and so simple to make.

First - get yourself a box of bisquick and follow the directions on the box.  In case you have the bag of bisquick but threw out the box, here's your recipe.

      Ingredients
    4 cups sliced fresh strawberries
    1/2 cup sugar
    2 1/3 cup Original Bisquick mix
    1/2 Cup milk
    3 Tbsp sugar
    3 Tbsp butter or margerine, melted
    1 container (8 oz) frozen, whipped topping, thawed.

    Directions
    Mix strawberries and 1/2 cup sugar; set aside. Heat oven to 425 F.
    Stir Bisquick mix, milk, 3 Tbsp sugar and the butter until a soft dough forms. Drop by 6 spoonfuls onto ungreased cookie sheet.

    Bake 10-12 min or until golden brown. split warm shortcakes; fill and top with strawberries and whipped topping.

    My alterations - I didn't use quite 4 cups of strawberries but kept the sugar at that amount.  I cooked the strawberries and sugar over medium heat to get a simple syrup going from the strawberries.  
    I also did not use the whipped topping and instead used what I had on hand, a can of whipped cream.  I also added a small scoop of ice cream.

The recipe makes 6 LARGE shortcakes so you could make them smaller and get 8 out of this.  

-stephanie

Monday, February 17, 2014

S'mores Dessert Pizza

With everyone in my house sick with a cold we spent all weekend lounging around and enjoying some quiet time in.  Last night was the last of those nights before another crazy week started so we decided to make it a pizza night.  Addie made her own little cheese pizza and I made a pizza for Rick and me to share.  We had a little leftover pizza crust so I made a fun dessert pizza with all the toppings for a s'more!

This looks pretty prior to cooking, but still tastes heavenly!


Ingredients
Pizza crust - we use Jiffy
Chocolate of some variety - I used hot fudge sauce
Graham crackers - crumbled up
Mini marshmallows

I highly suggest making your pizza crust and cooking it partially before loading your toppings.

Spread your chocolate around the pizza, then top with graham crackers & mini marshmallows.  Bake in the oven at approximately 425.  Toast the rest of the way until marshmallows start browning.  Cut & enjoy!

-stephanie

Thursday, November 14, 2013

Pumpkin Poppers

I made these tasty Pumpkin Poppers this morning and will be making them Thanksgiving morning for a tasty treat to start the day off right!  They taste light as most pumpkin recipes do.  Addie couldn't get enough of the cinnamon sugar all over them. 


Here's what you'll need.


Ingredients
1 3/4c flour
2tsp baking powder
1/2 tsp salt
1/2 tsp cinnamon
1/2 tsp nutmeg
1/2tsp ginger
1/3c vegetable oil
1/2c brown sugar
1 egg
1tsp vanilla extract
3/4c pumpkin
1/2c milk

Cinnamon Sugar topping
1 stick butter, melted
1/3c sugar
1tbsp cinnamon


Combine flour, baking powder, salt, cinnamon, nutmeg, and ginger in a large bowl.  In a separate bowl, combine oil, brown sugar, egg, vanilla extract, pumpkin, and milk. Pour wet ingredients into dry ingredients and mix until just combined.  Spoon batter into mini muffin tins that have been lightly sprayed.  Bake 12 minutes at 350 degrees.  Remove to cooling rack and allow to cool slightly.

While poppers are cooling, melt butter in a small bowl and combine cinnamon & sugar in another bowl.  Brush poppers with butter then roll in cinnamon sugar mix.  Enjoy!

-stephanie

Tuesday, November 5, 2013

Single Serve Cookies...All for Me!

 When the kids are sleeping, it's my time to relax and sometimes that involves a snack just for me.  It's always when they're sleeping when I crave a cookie but I never want to make an entire batch.  Finally I found a single serve cookie recipe that is actually very good. 


 Ingredients
2 tsp light butter
2 tsp packed brown sugar
2 Tablespoons flour
1/4 tsp baking powder
8 chocolate chips (Or m&ms if you're like me)

Slightly melt butter in microwave. Stir in brown sugar. Mix in flour and baking soda then chocolate chips. If the batter is a little too thick add a couple drops of milk. Bake on a cookie sheet at 350 for 9-11 minutes.

I'll be honest, I would have prefered these with chocolate chips however, I didn't have any on hand and I have bags and bags of m&m's from Halloween so it makes sense.  In fact, any of your leftover Halloween candy could be used in this recipe.  Also, I doubled it to make 4 cookies. 

PS.  If you didn't notice this recipe is eggless which means a couple things, I don't have to attempt to split a single egg and pregnant ladies & children could eat this raw!  Of course as an adult you should probably also avoid eating batter with egg in it but who follows that rule?!

-stephanie

Monday, October 7, 2013

Pumpkin Pound Cake

Pound cake is something I can't get enough of.  No matter the flavor, I love them all.  No discriminating here.  Combine that with my love for pumpkin and this recipe had me in heaven.  It's super easy and so delicious.  I've been snacking on this all week long.


Ingredients

1 1/2 cups flour
1/2 tsp cinnamon
1/2 tsp salt
1/2 tsp baking soda
1/4 tsp baking powder
1/4 tsp cloves nutmeg
1 1/2 cups sugar
1/2 cup vanilla yogurt
3 egg whites
1 cup canned pumpkin

Combine flour, cinnamon, salt, baking soda, baking powder, and nutmeg.  In a separate bowl, combine sugar, yogurt & egg whites and beat until incorporated.  Beat in pumpkin then slowly add the dry ingredients to the wet mixture.  Pour into a greased loaf pan and bake for 70 minutes on 350 degrees.

Enjoy!

-stephanie


Tuesday, September 17, 2013

Pumpkin Gooey Butter Cake


Looks fabulous right?  It is.  Even people who aren't big fans of pumpkin love this cake because it's such a good balance of cake to pumpkin ratio, then you add a dollop of whipped cream or ice cream and you're solid.  A friend of mine several years ago made this cake for a fall work potluck and I was in heaven.  He's now moved to California and I miss him like mad so every time I make this I think of him.

Ingredients
Cake
1 box yellow cake mix
1 egg
8 tablespoons melted butter

Pumpkin Mix
15 oz can pumpkin
8 tablespoons melted butter
8 ounces cream cheese, softened
3 eggs
16 ounces powdered sugar
1 tsp nutmeg
1 tsp cinnamon

Start by mixing the cake ingredients until combined.  Press into a greased 8x12 baking dish.  Next mix the pumpkin & cream cheese until creamy, slowly add melted butter and eggs until combined, then carefully incorporate your powdered sugar, cinnamon & nutmeg.  Beat until creamy & smooth.  Pour on top of cake mix and spread evenly.  Bake at 350 for 40-50 minutes.  Allow the cake to cool completely then add your topping of choice.  Next time I'm trying a homemade whipped cream with amaretto!

Also, I prefer this cake chilled slightly, the flavor pops a bit more.

Lastly, Top Baby Blogs did a reset on their website and we need your help with votes.  Can you click on the link below and then the cute owl on the left?  You can do this daily and we'd appreciate it!


Click To Vote For Us @ the Top Baby Blogs Directory! The most popular baby blogs

Wednesday, September 4, 2013

Lemon Cookies

This may be the easiest recipe ever and make sure to watch the end for another tip.  I found this on Pinterest and wanted to give it a try.  We spent some time with our close friends for a cookout and I wanted to bring a treat that was easy to make, because I honestly don't have any time, but also something really tasty!  So here it is, the easiest recipe you'll ever make.


What you need is pictured above.  That's it.


Mix the softened cool whip, box of lemon cake and egg together.


Spray a cookie sheet and drop by the spoonful.  Bake for 10 minutes until slightly browned on 350.


Sprinkle with powdered sugar and enjoy!  These are about 30 calories a cookie but with a dash of powdered sugar you're looking a little heavier but still a great option if you're trying to watch your waistline but still enjoy a good treat.  

Also, you can make this same recipe with any box cake mix.  Red velvet, funfetti, etc.  So many options and so easy to make.  You can whip these up last minute if you need something on the fly!

-stephanie

Wednesday, August 28, 2013

Recipe: Blackberry Crisp

Blackberry picking this weekend was super fun and with two large baskets full of blackberries, we needed to make some blackberry crisp.  So delicious, this blackberry crisp was.  It was good reheated as a leftover but fresh it was simply amazing!


Ingredients
5c fresh blackberries
4 tablespoons sugar
2c flour
2c rolled oats
1 1/2c brown sugar
1 tsp cinnamon
1/2 tsp nutmeg
1 1/2c butter

Directions
Preheat oven to 350 degrees.  In a large bowl combine blackberries and sugar, toss gently and set aside.  In a separate bowl, combine flour, oats, brown sugar, cinnamon, and nutmeg.  Cut in butter until crumbly. Press half the crumble mixture in the bottom of a 9x13 pan.  Cover with berries and sprinkle remaining crumble mixture over berries.  Bake in oven 30-40 until top is brown and berries are bubbling.  Serve with ice cream!

-stephanie

Wednesday, July 17, 2013

Healthy Chocolate Chip Oatmeal Cookies

I found this recipe on Pinterest, well sort of.  The picture I pinned looked good and the details were in the description so I pinned it before I actually clicked back to the site.  Of course, once I get there the recipe is for an entirely different cookie that didn't seem easy or contain ingredients I had on hand.  So I decided to take the description from the picture and changed it a little for what I thought might taste good.  After calculating out the calories for the amount of cookies you can make, these are just under 100 calories each!


Ingredients
2 ripe bananas
1 heaping tablespoon peanut butter
1 cup quick oats
1/2 cup chocolate chips
1/4 cup brown sugar

Smash the bananas until they're smooth, add the peanut butter and smooth until creamy.  Add the oats, chocolate chips and brown sugar and mix until fully combined.  Scoop by the spoonful onto a cookie sheet and bake at 350 for 15 minutes.  

If you're like me, I like my cookies with a sprinkling of salt on the top so I lightly salted mine.  These are best the same day and still warm.  The next day they're good but get a little gooey.

-stephanie

Thursday, January 24, 2013

Addie's Birthday Desserts - Year 2

The best part of any party is the dessert.  Am I right or am I right?  Last year I went all out with a dessert table and though I'd love to do this again, we're trying to keep it small and simple.  So this year, I'm only doing a cake, cupcakes and some cookies.  Last year I made a single 6" cake for Addie's smash cake and this year I'm making a 6" cake but three tiers and a surprise in side.  Check it out.


The last is iced sugar cookies.  I can't share the link because it's a family recipe and my mom would kill me if I did share.  I'll be cutting out the cookies in the shape of the number 2.  Last year I made rice krispie treats in the shape of a number one so the numbered food/dessert will become a theme in our house.

Sounds awesome right?  I cannot wait to see how the cake turns out and to eat those cupcakes!

Tomorrow is all about decorations.  You can read about the invitations here and party food here.

-stephanie

Thursday, December 20, 2012

Gourmet Candy Apples 2012

Each year, my BFF Mary and most of the women in her family all gather on a Sunday in December to make gourmet candy apples.  It's been going on for years and it's great fun and great food too!

Nearly 200 apples will have been dipped in caramel, chocolate and decorated in various candies.  If you buy these apples at a gourmet candy store, you're look at anywhere from $8-$25 on a single apple.  These cost just under $2 per apple to make and are really much easier than you would imagine!

So here's a rundown of what you need:
-sturdy wooden sticks
-apples
-good quality caramel (you'll want to buy it in blocks versus individually wrapped candies)
-various chocolate (milk, white, dark)
-various candies (nuts, peppermints, m&m's, salt, etc)
-mallet or hammer
-double broiler type set up
-parchment paper
-nonstick spray
-candy bags to put the individual apples in for presentation

First thing you do is grab an apple, a stick and a mallet or hammer and hammer down the pointed end of your stick into the apples.

apple1

Melt down some of your caramel in the double broiler.  Take an apple and completely cover it in caramel.  You'll need a knife to swipe the bottom clear of caramel.  You'll need to hold the apple until the caramel cools alternating right side up & upside down.  Once cool enough place caramel apple on parchment paper with nonstick spray.  The nonstick spray is super important.  Do this for all of your apples, it's nice to have multiple hands to hold the apples as the caramel cools, otherwise your process will be a bit slower.

apple2

Once all apples are dipped in caramel and cooled you can begin your chocolate dipping & decorating.  You'll notice that some of the caramel slide down the apples, this is okay, just take the apple in your hand and slowly mold the caramel around the apple.  If you have any bubbles in the caramel, this is okay, just grab a toothpick and pop them.

Again, you'll need your double broiler set up with whatever chocolate you want to dip the caramel apples in. I prefer milk chocolate dipped caramel apples and then drizzle dark & white chocolate.  Just depends on your taste preferences.  Just like when you dipped the apple into the caramel, you'll want to hold the chocolate covered apples for a few minutes until the chocolate has dried a bit before setting down.  If you like adding nuts, candies, sprinkles, etc you can do it once you dip your apples in the chocolate.

apple3

Note:  In order to get nuts, candies, etc to stick to your apple you'll need to dip in chocolate and let the chocolate cool slightly before covering with nuts or candies.  If you do it too soon the nuts and candies will slide off.

It sounds like a lot but it really isn't.  Be a little patient your first time around.  Once you get the hang of it it runs really smoothly.  Like I said, the more hands you have around to help, the smoother things will run.  With about 200 apples, we had about 10 people helping and we each left with 10 apples.

It's a great tradition to carry on for years to come.  I think next year will be a good age to introduce Addie and can't wait to see her have fun decorating with us.  What a coincidence that exactly a year ago today I blogged about it.  You can read about it here.

-stephanie

Thursday, October 25, 2012

Pumpkin Angel Food Cake with a Salted Caramel Glaze

I found this on Pinterest a week or so ago and I was dying to make it.  Sounded fancy by the title but when I read the instructions I'm thinking, this is doable!


The cake
1 box Betty Crocker white angel food cake mix
1 tbsp. Gold Medal all-purpose flour
1 tsp. cinnamon
¼ tsp. ginger
1/8 tsp. nutmeg
1/8 tsp. cloves
¾ cup canned pumpkin (not pumpkin pie filling)
1 cup cold water

Move oven rack to lowest position; heat oven to 350°F. In extra-large glass or metal bowl, beat all cake ingredients with electric mixer on low speed 30 seconds. Beat on medium speed 1 minute. Pour into ungreased 10-inch angel food (tube) cake pan.

Bake about 35 minutes or until crust is dark golden brown and cracks are dry. Immediately turn pan upside down onto heatproof funnel or glass bottle. Let hang about 2 hours or until cake is completely cool. Loosen cake from side of pan with knife or long metal spatula. Turn cake upside down onto serving plate.

The Glaze 
¼ cup butter, unsalted
¼ cup dark brown sugar
¼ cup granulated sugar
½ cup whipping cream
¼  tsp. sea salt
2tsp. cinnamon

In heavy small saucepan melt 1/4 cup unsalted butter over medium-low heat. Stir in 1/4 cup packed brown sugar and 1/4 cup granulated sugar. Bring to boiling, stirring constantly.  Add 1/2 cup whipping cream and return to boiling. Boil for 2 minutes, stirring constantly.  Remove from heat; stir in 1/4 to 3/4 tsp. sea salt and cinnamon. Cool completely. 

Yummy!

-stephanie

Thursday, August 2, 2012

Goat Cheese with Roasted Red Cherries Ice Cream

Yes, I'm about to show you how to make this amazing ice cream but first let me make this very clear, this is not my recipe.  A friend of mine recently got me the Jeni's Splendid Ice Creams at Home recipe book because Jeni's Splendid Ice Creams is one of my favorite in the city.  In fact, Jeni's has been voted #1 ice cream in America!  It's amazing and it's all based out of Columbus centered on the idea of making fabulous ice cream with local ingredients.  Jeni's is located in central Ohio but they've recently opened a shop in Nashville and they ship via mail as well.  You can find out more about Jeni's here.


Here's what you need.  We bought the Cuisinart Ice Cream Maker from Amazon and we love it.

Cuisinart Ice Cream Maker

Recipe

Ingredients
2 cups whole milk
1 tablespoon plus 1 teaspoon cornstarch
1/2cup (4oz) fresh goat cheese
11/2 oz (3 tablespoons) cream cheese, softened
1/4 teaspoon fine sea salt
11/4 cups heavy cream
2/3 cup sugar
1/4 cup light corn syrup

Roasted Cherries
2 cups pitted fresh or frozen (not thawed) red or black cherries
2/3 cup sugar
2 teaspoons cornstarch


I'll start you on the Roasted Cherries though I didn't capture those pictures.

Preheat oven to 400 degrees.  Combine all ingredients in a 9 inch square baking dish, tossing to mix.  Roast 30-45 minutes until the juices are thickened and bubbly, stirring every 15 minutes.  Let cool completely, then chill in the refrigerator.


And now, the ice cream.

Begin by mixing the cornstarch with 2 tablespoons of milk in a small bowl to make a smooth slurry.  


Whisk the goat cheese, cream cheese, and salt in a medium bowl until smooth.  


Combine the remaining milk, cream, sugar, and corn syrup in a 4-quart saucepan, bring to a rolling boil over medium-high heat and boil for 4 minutes.  


Remove from heat and gradually whisk in the cornstarch slurry.  


Bring the mixture back to a boil over medium-high heat and cook, stirring with a rubber spatula until slightly thickened, about a minute.  Remove from heat.

Gradually whisk the hot milk mixture into the cream cheese mixture until smooth.  


Fill a large bowl with ice and water.  Pour the mixture into a 1 gallon Ziploc freezer bag and submerge the sealed bag in the ice bath.  Let stand, adding more ice as necessary, until cold, about 30 minutes.


Pour the ice cream base into the frozen canister and spin until thick and creamy.  


Pack the ice cream into a storage container, alternating it with layers of the cherries and ending with a spoonful of cherries.  Press a sheet of parchment directly against the ice cream and seal with an airtight lid.  Freeze until firm, at least 4 hours.


Be prepared because this is heaven!  Gourmet ice cream you can make at home.  So yummy!

-stephanie

Don't forget to check out our giveaway going on now for the Bye Bye Bacteria Antimicrobial Crib Sheet.

Thursday, July 5, 2012

Patriotic Dessert

Yesterday we spent the evening at my dear friend Mary's house for a cookout to celebrate the 4th of July and I knew I wanted to make a fun patriotic dessert and this is what I found via Pinterest at Skinny Taste.


This was so tasty, light and refreshing in our 100 degree heat wave.  I made it earlier in the day so it's a great recipe to make ahead and forget about while you're busy cooking or cleaning, preparing for your party.

Ingredients
10 oz angel food cake, cubed
2 pints strawberries
2 pints blueberries
6 tablespoons sweetened condensed milk
1 1/2 cups cold water
1 pkg sugar free white chocolate pudding mix
12 oz whipped topping, thawed

Directions
Whisk the condensed milk and water in a bowl.  Add pudding mix and whisk for 2 minutes then let stand for 2 minutes before folding in whipped topping.

While you're waiting for your pudding mix to set, clean blueberries and strawberries making sure to remove any stems.  Slice strawberries.  

Begin arranging your trifle with a layer of angel food cake (half of your 10 oz), then add a layer of blueberries (slightly less than half of your 2 pints), add a layer of whipped cream and smooth out, then add a layer of strawberries (slightly less than half of your 2 pints).  Repeat this process except finish with a pretty layer of strawberries & blueberries for presentation!  I got really excited and forgot to save some blueberries for the top of mine.  Cover and refrigerate for at least 1 hour.

Note:  You can make this a really healthy dessert by using a fat free sweetened condensed milk and fat free or lite whipped topping.

-stephanie

Wednesday, January 25, 2012

Adalyn Turns One

We've been counting down the days until Adalyn's first birthday and Saturday it finally arrived.  After much planning and idea boards over at Pinterest that you can read about initial planning here, invitations here, menu thoughts here, dessert ideas here, and decoration ideas here, the day finally came together.

We had the party at a local community clubhouse which really worked out as far as space was concerned.  Our tiny house just wouldn't have held that many people for a first birthday party.  The downside is I had to make everything and then transport it and set up the day before whereas having it at our house I could have set up a week in advance and saved the cooking/baking for later.

Decorations.  I made a lot of decorations via ideas from Pinterest.  I started all of this weeks before her party because it was something simple I could accomplish and forget about until the party.

Happy Birthday Adalyn!! Banner
Party Lanterns

Monthly Photos


Cake Bunting

Highchair Ribbon
Tutu
Food.  I had a really hard time deciding on the menu.  I really wanted to do the chili/baked potato bar but Rick nixed the idea.  I have to say it would have been easier than what I decided on.  Here's what the menu looked like.

Cheese & crackers
Hot dog bar
Buffalo chicken dip
Pasta salad
Veggie Pizza


Drinks.  You can't eat without washing it all down right?  So I wanted to have something pretty simple as far as drinks went.  I originally was going to do pop however I knew if I did that we'd have a lot leftover and we don't drink pop so we'd be stuck with all of it.  Instead I found a great punch recipe from my girl Paula Deen.  It was fabulous, but be prepared it's full of sugar.  You'll notice the gray and white striped straws that go with the original color scheme, gray with pink/teal.  I found those here.


I also really wanted the hot chocolate bar.  I mean we are in the middle of winter in Ohio so it was perfect for the party.  I found the recipe here.  It was tasty!

Marshmallows, whipped cream and Bailey's to compliment.
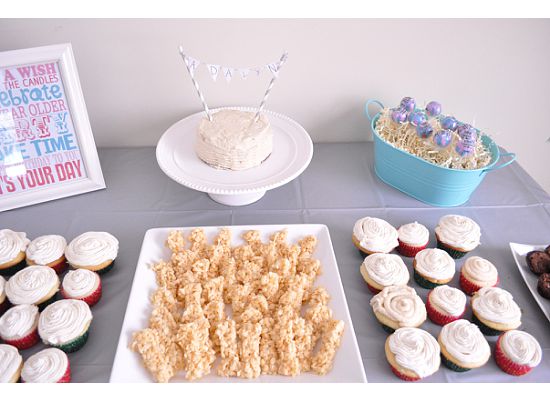
Dessert.  The dessert bar was my favorite part.  I'm a girl who loves desserts so I knew I wanted to have a variety of options available to eat or take home.    Also, I decided to forgo the typical birthday cake and do a smash cake for Addie and cupcakes for everyone else.  The dessert bar consisted of Addie's smash cake, cupcakes, brownie bites, #1 rice krispie treats, oreo truffles, and teal/pink suckers.


Notice the gray straws - multipurpose
Gifts.  We opened some presents.  She got a variety of things, toys, clothes, Tiny Toms!!!!!  She also got a cute chair and a lady bug riding toy.


She looks like a princess in this chair

I guess she'd rather lay on the chair then open gifts.


Cake.  Then we all watched her with the cake.

We sang Happy Birthday.


She wasn't really sure of the cake.  The icing was a buttercream icing which I iced the night before so it wasn't soft and fluffy.

This is her, eww I don't think I want to touch this face.

I attempted to feed her a piece thinking if she had a taste she'd like it.  This was her avoiding me.

We gave her a spoon to play with the cake thinking she might try it once she started breaking it down.


She'd rather feed her momma :)


I finally snuck a taste to her.


At this point, she realized she likes it.


So I may as well eat it now.


She was really breaking it up and pulverized the cake.

 This is her clapping!  We say, "Yay!" and she claps.


I love this picture of her smiling.


And this is our only family picture we captured.  Please ignore my awful look.  I've been instructed to wear glasses 100% of the time and I need a tan.


It turned out to be such a wonderful day and even with a cold she hung in there and enjoyed herself so much. I can't believe how much she's changed and cannot imagine how different she'll be a year from now.

LinkWithin

Related Posts Plugin for WordPress, Blogger...